Battery switch on travel trailer function is crucial for managing your RV’s power. Understanding how these switches work, their different types, and proper maintenance is key to preventing dead batteries and ensuring a smooth camping experience. This guide breaks down everything you need to know about your travel trailer’s battery switch, from its basic function to troubleshooting common problems.
We’ll explore the various types of switches – single-pole, double-pole, and double-pole double-throw – detailing their inner workings and comparing their pros and cons. We’ll also cover ideal placement for easy access, the importance of proper wiring and connections (including fuses and circuit breakers), and a preventative maintenance schedule to keep your system running smoothly for years. Finally, we’ll walk you through troubleshooting steps and upgrading or replacing your switch if needed.
Battery Switch Location and Accessibility
Finding your travel trailer’s battery switch quickly can be a lifesaver, whether you’re dealing with a dead battery or need to disconnect power for maintenance. Knowing its location is crucial for both convenience and safety.The importance of easy access to your battery switch cannot be overstated. A readily accessible switch allows for quick disconnection in emergency situations, preventing further damage or even hazards.
Easy access also simplifies routine maintenance tasks like battery checks and cleaning. A poorly placed switch can lead to unnecessary frustration and delays when you need to act fast.
Typical Battery Switch Locations
Battery switches in travel trailers are typically found in a few common areas. Often, they’re located near the batteries themselves, usually in a compartment under the trailer, sometimes in the tongue area, or even inside a dedicated electrical bay. Other times, manufacturers place the switch inside a storage compartment, often near the entry door or close to the main electrical panel.
The exact placement varies significantly between different models and manufacturers. Knowing your trailer’s specific layout is essential.
Ideal Battery Switch Placement, Battery switch on travel trailer function
An ideal battery switch location balances accessibility with protection. The diagram below illustrates this concept. Imagine a simple sketch: a rectangular box representing the travel trailer. Inside, near one side (representing the exterior, often the tongue or a side compartment), a smaller rectangle represents the battery compartment. A small circle, clearly labeled “Battery Switch,” is drawn directly above the battery compartment, but slightly offset to be easily reached without requiring awkward bending or reaching.
The area around the switch is shown as a slightly recessed area, suggesting a protective cover or enclosure that shields the switch from direct exposure to rain or debris. The access to the switch is shown as straightforward and unobstructed. This design emphasizes proximity to the batteries for easy connection/disconnection while providing protection from the elements and ensuring comfortable reach.
The switch should be clearly visible and labeled for quick identification.
Troubleshooting Common Battery Switch Issues

Your travel trailer’s battery switch is a crucial component, controlling the flow of power to your appliances and systems. Problems with this switch can leave you stranded without power, so understanding common issues and how to troubleshoot them is essential. This section will guide you through identifying and resolving some of the most frequent problems.
Battery switch malfunctions often stem from simple issues, easily fixed with a bit of inspection and basic maintenance. More serious problems may require professional assistance, but a proactive approach to troubleshooting can often save you time and money.
Visual Inspection for Damage and Corrosion
Before attempting any repairs, a thorough visual inspection is crucial. This allows you to identify problems like corrosion, loose connections, or physical damage to the switch itself. Corrosion, often appearing as a greenish or whitish buildup on the terminals and switch housing, is a common culprit, hindering electrical conductivity. Loose connections can cause intermittent power or complete failure.
Physical damage, such as cracks or broken parts, may also be visible.
Here’s a step-by-step guide to inspect your battery switch:
- Disconnect the Battery: Always disconnect the negative (-) battery terminal before starting any work on the electrical system. This prevents accidental shocks and short circuits.
- Locate the Switch: Identify the location of your battery switch. Refer to your trailer’s manual if needed.
- Examine the Terminals: Carefully inspect the battery switch terminals for any signs of corrosion. Look for greenish or whitish buildup, which indicates corrosion.
- Check for Loose Connections: Ensure that all wires are securely connected to the terminals. Gently wiggle each wire to check for looseness. If you find loose connections, tighten them with appropriate tools.
- Inspect the Switch Housing: Examine the switch housing for any cracks, damage, or signs of overheating (discoloration or warping).
- Reconnect the Battery: Once the inspection is complete, reconnect the negative (-) battery terminal.
Troubleshooting Flowchart
This flowchart will help you systematically diagnose and resolve common battery switch problems. Remember to always disconnect the negative battery terminal before working on the electrical system.
- Problem: No power to appliances.
- Check the battery switch: Is it in the “ON” position?
- If “ON,” check for corrosion: Clean terminals with a wire brush and baking soda solution. If corrosion is severe, replace the switch.
- If no corrosion, check connections: Are all wires securely connected? Tighten any loose connections.
- If still no power, check the batteries: Are they charged and connected correctly?
- If batteries are fine, check fuses and circuit breakers: Replace blown fuses or reset tripped circuit breakers.
- If the problem persists, the switch may be faulty: Replace the battery switch.
- Problem: Intermittent power to appliances.
- Check for loose connections: Tighten any loose connections at the battery switch and battery terminals.
- Check for corrosion: Clean terminals and connections.
- If problem continues, the switch itself might be faulty: Consider replacing the switch.
Wiring and Connections of the Battery Switch
Understanding the wiring configuration of your travel trailer’s battery switch is crucial for safe and reliable operation. This section details typical wiring setups, the protective role of fuses and circuit breakers, and provides a visual representation of a common dual-battery system. Proper wiring is essential to prevent damage to your batteries, electrical components, and even potential fire hazards.
Typical Wiring Configurations
A battery switch acts as a central control point, allowing you to isolate or connect different battery banks. In a single-battery system, the switch simply connects the battery to the trailer’s electrical system. In a dual-battery setup (common in travel trailers), the switch typically allows you to: (1) connect both batteries in parallel for combined power, (2) connect only the main (house) battery to the trailer’s system, (3) connect only the auxiliary (starting) battery to the vehicle’s starting system, or (4) isolate both batteries completely.
So, you’re an audiophile who travels? Awesome! Check out this guide on building the perfect audiophile travel setup to keep your ears happy on the go. It’s crucial to protect your investment, too, so don’t forget to look into travel insurance before you jet off. Consider getting a quote from Aon travel insurance for peace of mind; they often have great coverage for expensive electronics.
Wiring usually involves heavy-gauge cables to handle the current demands of the system, with proper crimped connectors and secured connections to prevent voltage drops and corrosion.
The Role of Fuses and Circuit Breakers
Fuses and circuit breakers are critical safety components protecting your battery switch and associated circuits from overcurrent situations. Fuses are one-time use devices; they melt and break the circuit if excessive current flows. Circuit breakers, on the other hand, can be reset after an overload, offering convenience. They are typically placed at various points within the system: close to the battery, at the switch itself, and on individual circuits within the trailer.
So, you’re an audiophile who travels? Awesome! Check out this guide on building the perfect audiophile travel setup for pristine sound on the go. It’s crucial to protect your investment, too, so remember to get travel insurance. Seriously, consider getting a solid policy like Aon travel insurance before you jet off; you’ll thank yourself later if anything goes wrong with your precious gear.
Happy travels and happy listening!
A fuse or breaker placed near the battery protects the main wiring from short circuits, while those near the switch or individual circuits protect the loads (lights, appliances, etc.) from overloads. Always use the correct amperage rating for fuses and circuit breakers to ensure proper protection without unnecessary tripping.
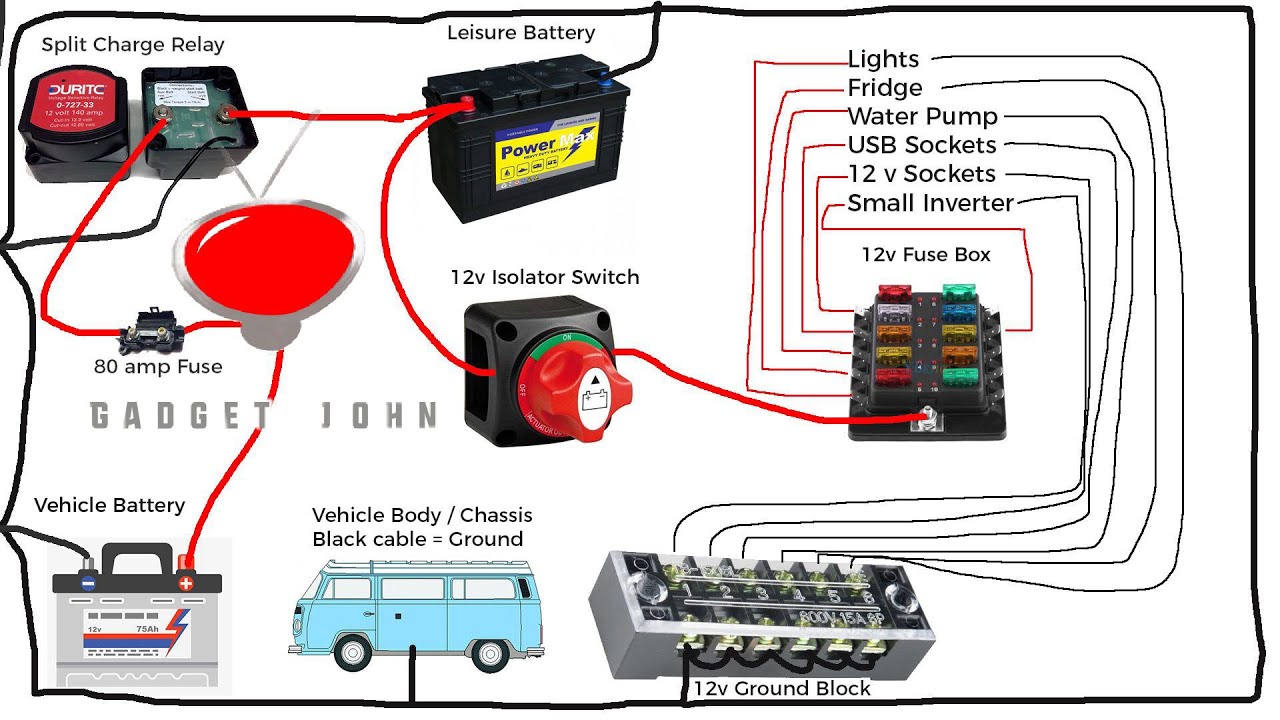
Wiring Diagram for a Dual-Battery System
The following describes a typical wiring schematic for a dual-battery system with a battery switch. Imagine a diagram with two batteries (Battery 1 and Battery 2) connected to a battery switch. The switch has several positions: “Both,” “Battery 1,” “Battery 2,” and “Off.”
The positive (+) terminals of both batteries are connected to the input terminals of the battery switch.
The negative (-) terminals of both batteries are connected directly to the trailer’s chassis (ground). This provides a common ground point.
From the output terminals of the battery switch, heavy-gauge wires run to a fuse block or circuit breaker panel. This panel then distributes power to various circuits within the trailer.
Individual fuses or circuit breakers are in place for each circuit (lights, water pump, etc.) to provide additional protection.
An additional fuse or circuit breaker should be placed on the positive cable from the battery to the switch to protect the main wiring.
This setup allows for selective use of the batteries and provides multiple layers of protection against overcurrent situations. Remember, always consult with a qualified electrician if you’re unsure about any aspect of your travel trailer’s electrical system. Improper wiring can lead to serious damage or even fire.
Maintenance and Care of the Battery Switch: Battery Switch On Travel Trailer Function
Keeping your travel trailer’s battery switch in top condition is crucial for reliable power and preventing costly repairs down the road. Regular maintenance ensures a long lifespan and minimizes the risk of electrical problems while you’re enjoying your adventures. Neglecting this simple task can lead to corrosion, poor connections, and ultimately, a dead battery when you need it most.Proper cleaning and inspection are key to preventing corrosion and ensuring a secure connection.
Corrosion buildup on the terminals and connections can significantly impede the flow of electricity, leading to reduced battery performance and even potential fire hazards. By following a simple maintenance schedule, you can avoid these problems and keep your battery switch functioning flawlessly.
Cleaning Battery Switch Terminals and Connections
Corrosion is the enemy of any electrical connection, and your battery switch is no exception. Regular cleaning prevents this buildup. Begin by disconnecting the battery cables from the switch. Use a wire brush or a specialized battery terminal cleaner to remove any corrosion from both the terminals and the switch itself. A baking soda and water paste can also be effective at neutralizing corrosion.
After cleaning, apply a dielectric grease to the terminals and connections. This grease protects against future corrosion and helps ensure a good electrical connection. Remember to reconnect the battery cables securely after cleaning.
Preventative Maintenance Schedule
A simple preventative maintenance schedule can greatly extend the life of your battery switch. Consider the following:
A visual inspection should be performed every three months, or before each trip. Check for any signs of corrosion, loose connections, or damage to the switch itself. If any issues are found, address them immediately.
A thorough cleaning, including the application of dielectric grease, should be performed at least once a year, or more frequently in harsh environments like coastal areas or where there’s high humidity.
Finally, a full functional test should be conducted every six months. This involves checking the switch’s ability to connect and disconnect the battery, ensuring the proper flow of power. If the switch is failing to operate correctly, it’s time to consider replacement.
Mastering your travel trailer’s battery switch is about more than just turning power on and off; it’s about understanding how to protect your investment and enjoy worry-free camping adventures. By following the guidance provided – from understanding the different switch types to performing regular maintenance – you can ensure your RV’s electrical system remains reliable and efficient. So, take the time to learn about this vital component, and you’ll be well-equipped to handle any power situation on the road.
Popular Questions
What happens if my battery switch is left in the “off” position?
Leaving the switch off completely disconnects your house batteries from the charging source (usually your tow vehicle or shore power). This will prevent your batteries from charging and could lead to a dead battery.
Can I use a battery switch to connect different types of batteries (e.g., lead-acid and lithium)?
Generally, no. Different battery types have different voltage and charging requirements. Connecting incompatible batteries through a standard switch could damage the batteries or cause other electrical problems. Consult a professional for advice on mixed battery systems.
How often should I inspect my battery switch for corrosion?
Inspect your battery switch at least twice a year, or more often if you frequently camp in wet or humid conditions. Corrosion can severely impact performance and safety.
What size fuses/circuit breakers should I use with my battery switch?
The appropriate fuse or circuit breaker size depends on the amperage rating of your battery system and wiring. Consult your RV’s wiring diagram or a qualified electrician to determine the correct size.
